It's been a few days since I've posted anything and I feel guilty! Not sure why, as I have family stuff that needs tending to on a daily basis, so it's understandable, but I feel so neglectful. BUT ~ I did make some cute things here and there over the last few days and I want to share them with you!
I ran across the cutest project the other day and decided right then and there that I was going to try it out. It's from the website "Busted Button" and it's adorable.
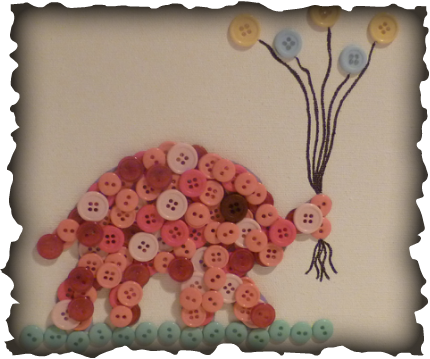
I wanted to make something cute for Baby Girl's room ~ Did I mention that we are finally getting our own place?! Yup! In the next couple of months we are moving and I want to make some cute things for the new place, including Baby Girl's room. Anyway, I saw this cute little button on canvas project and ran to JoAnn's to get my supplies..... I just LOVE this! I'm not 100% happy with the way the strings turned out and I may still try something else....maybe some yarn...but over all, I think it will look cute in her new room.
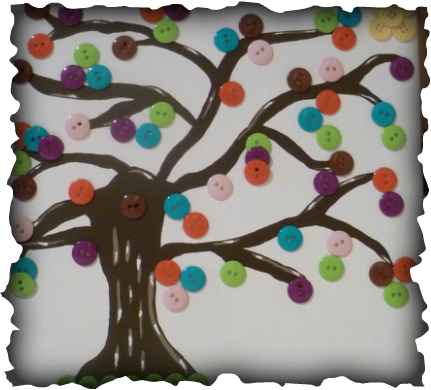
I also decided to try my hand at painting a tree with buttons....What do you think????
I am by NO means, an artist/painter, so I'm pretty happy with this one as well.
Both of these canvas projects are on a 10x10 canvas that I bought from JoAnn's. They're pretty cheap and it's fun making your own art pieces, IMHO :-)
Hope you like!
Until next time....
Mini Monster!
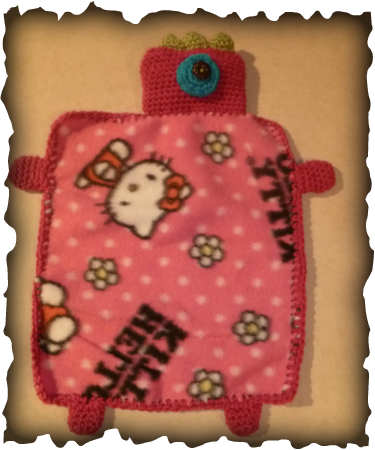
I mentioned in an earlier post that I wanted to make Baby Girl one of these ~
I finally bought the fleece, along with an awl, so I could punch holes in the fabric. I had never used one before and I was actually more interested in a rotary cutter/blade but JoAnn's doesn't carry the skip stitch blades needed for making evenly spaced holes along the fabric's edge. I was surprised actually because they normally have anything and everything I'm looking for.
That being said, I settled for the awl (AND used a 50% off coupon so I got it for $3.50!), bought a half yard of fleece and went to work on this cute little monster blankie for Baby Girl.
Did I mention the fleece has Hello Kitty on it?! I love Hello Kitty so I was really happy to discover it was on sale for 50% off.
I love the idea of this little blankie for little kids. It's like a "woobie" (think back to Mr. Mom and his little boy's security blanket ~ the woobie!) and it's portable and pretty much hassle-free. Plus it's too cute :-) I offset the head just a bit but other than that I tried to follow the pattern as it was posted on the original blog that I got it from.
The best part was when I handed it to Baby Girl and her eyes lit up. A huge smile spread across her face, she hugged her "woobie" to her chest and rubbed her face against the soft fleece. It really melted my heart to see that. She then decided to jibber jabber and talk to her new friend :-)
Until next time....
Today is a "Whut Whut" Day!
What's a "Whut whut" Day you ask? It's a day to reveal my latest work! And then I say, "Whut whut"?! Oh yeah! Let's look!
First let me say that I am really pleased with how this project turned out. It was up in the air for a moment, but I think it all worked out well.
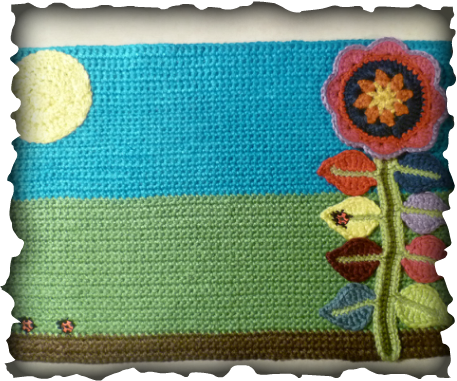
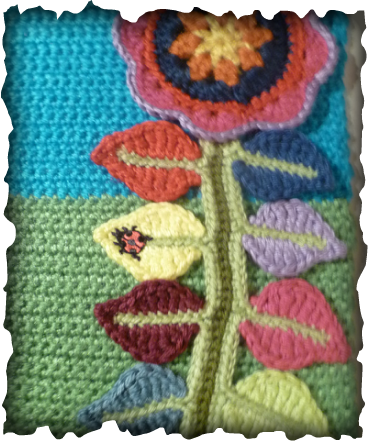
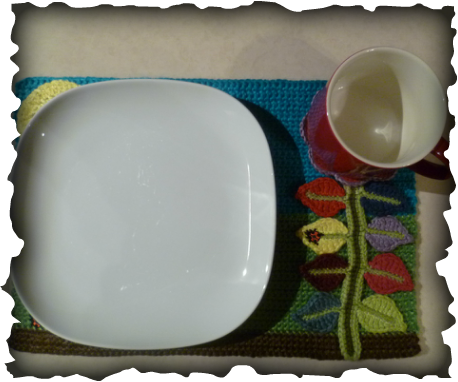
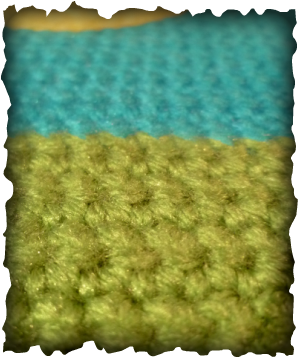
I gave you a sneak peek the other day of something I was working on, and well, I finished it! I decided to make some placemats for our kitchen table :-) I only made ONE, but you will get the idea. Now to just finish the other three.....
I used Lucy from Attic 24's flower pattern and thought it would go really well with the feeling I was going for. Do you love it?!?! I do! I got the little lady bugs from JoAnn's and ironed them on :-) A couple of shots "in use".....
I will be sure to share the other three placemats once I've finished them (Lord knows how long that will take!)
On a more personal note....Poor poor Baby Girl lost her balance (while sitting!) and fell face first onto one of her buckets/toys and got a shiner! She was really brave, and being a tough little thing, she played on!
She was a real trooper, even nerding out for us, as usual!
Until next time....
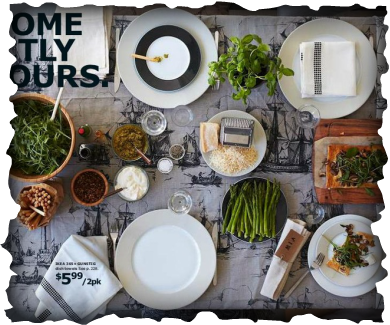
Monday Mood Board!
Today I'm sharing things that make me feel comfy and cozy. This almost certainly means you'll be seeing lots of kitchen-y type stuff.
The kitchen is my favorite place in the world. Having worked as a chef for many years, it's where I feel most comfortable. Seeing table settings, gadgets, food, linen ~ it makes my heart jump and skip a beat!
So, sit back and enjoy my collection of piccies that reflect what makes me feel at home....
 I would grow Basil & Parsley!
If someone made a hybrid Basil plant and turned it into a TREE, i would have them all over my house!!!!
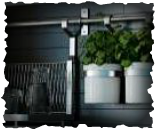
 I love the idea of this kind of organization all tucked away but waiting to be used.
This next picture makes me feel all warm and cozy. You can't see it now because my cute little border blocked it from view, but to the left, the back door was ajar just a hair. I love this....Maybe the kids ran out to play, or maybe a neighbor called and is on her way over for some coffee and I left the door open in anticipation....
The couch and table beckons me to curl up with my latest work of crochet and some hot tea while Baby Girl sits on the floor playing quietly (It's MY fantasy! Don't knock it! Lol)
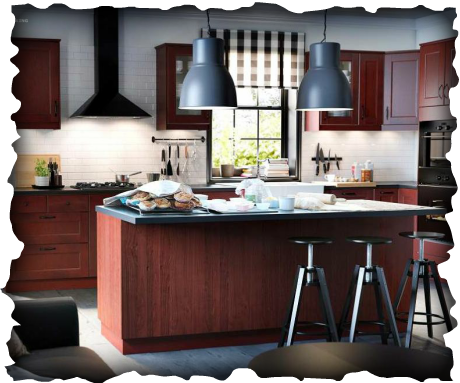
I love the darker wood and the island.....
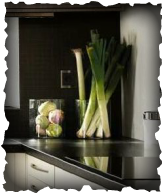 Any time I can display fresh fruits, vegetables, flowers, etc. I do. I especially love the feeling I get when I see food like this ~ Displayed as major eye-catching pieces.
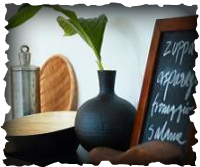 I LOVE Chalkboards!!!! Give me a chalkboard and I'll list a menu, I don't care where it's at!
I found all these inspiring items in the new IKEA catalog. It's a dangerous place to say the least! I hope you got a feel for what my Mood Board portrayed. It made me feel all warm inside :-)
Until next time....
Oh Happy Hooky Days
Guess who went to breakfast with her Hubby, followed by a trip to JoAnn's?! Yup, ME! Whut whut?!?! It was BLISSFUL :-) I bought some of my "regular" Vanna's Choice yarn and a few other bits.
I've really been wanting to attempt this too cute pattern I found on Ravelry quite some time ago but haven't had the tool or material. So today, with my 50% off coupons, I bought an awl and some fleece.
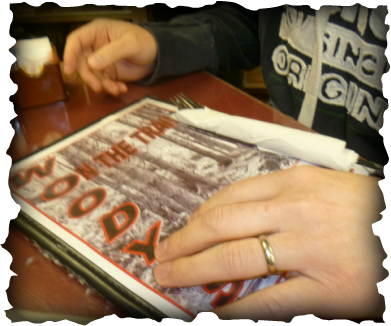
I've also been working on a placemat for our dining room table. It's almost finished but I'm really excited to show you in the next day or two how it turns out. Here's a sneak peek: Do you know what it is?! Do you have any ideas?! I should have it finished by tomorrow and then I'll only have 3 more, lol!
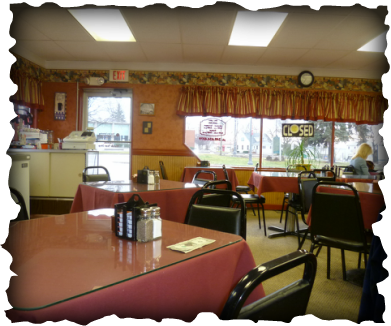
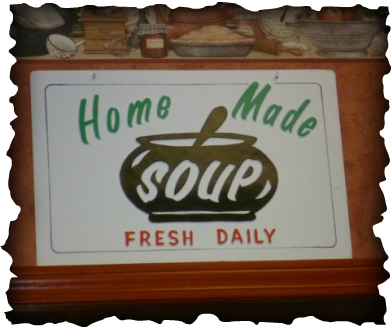
There's an awesome little hole in the wall diner called Woody's near our house which is only open on certain days for a limited time. It fills up quickly with the locals and I've never seen it empty. Now, being a former chef (and one who has cooked for celebrities and politicians, etc.) I am VERY picky about the food I eat. I wouldn't call myself a food snob, but I know a lot about food and whether or not it's crap. So when Hubby and I decided to head over there this morning, my mouth started to immediately water. I usually stuff myself and my stomach hates me for it, but I can't help myself. I lose all control.
You can see just how NOT fancy this place is. But I can honestly say that looks can be very deceiving, especially in this case!
Here's Hubby waiting patiently....
Right before people started pouring in....
Quite simple really, not charming, but the food and service is soooooo gooooood!
This hangs on the wall over the kitchen area
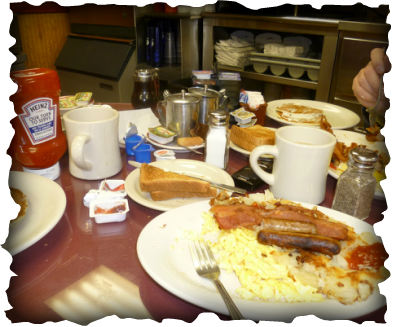
I wanted to take a piccie just as the food came but we couldn't wait to eat and honestly, I forgot till about mid-way through and I grabbed the camera!
I never said the food was healthy, just DELICIOUS!
Hubby likes his eggs sunny side up. In England they don't say that, he informs me after I help him order....They simply say fried eggs, regardless of doneness.
All in all, it was an enjoyable morning and I came home full and happy!
Until next time....
Juls xoxo
Weekend Family Time! Woo Hoo!
I just love it when the weekend comes. I get to spend it with the Hubby and it makes all the missing him from during the week fade into the background.
We usually go to the grocery store to get things for the upcoming week and nose around. I also make a trip to JoAnn's, especially if I've got coupons!
I'm signed up on their mailing list which means I get the latest offerings, but I also use their mobile "Wallet" on my tablet. The Wallet usually consists of the same coupons that get mailed out, but sometimes there are different and BETTER ones. This is useful too because sometimes the snail mail coupons don't get here in time so I am able to just take my tablet or Smart Phone with me. They scan the coupons at the register just like regular coupons. Yay!
Here is the link to the mobile Wallet I also want to share another recipe with you! It's for Vanilla Bread Pudding and it's DELICIOUS!
I found the recipes on AllRecipes (UK site) which is awesome so check it out for other great recipes as well.I'll stash this recipe under recipes too if you want to come back to it at a later time. That way you won't have to sift through post after post to find it. What's that you say? I'm so thoughtful? Ahhhh, well, you know, I do it for your happiness :-)(This is converted to US measurements)Serves: 9 - 1 white loaf, torn into small pieces
- 1L hot semi-skimmed milk
- 3 eggs, beaten
- 14 oz caster sugar
- 2 tablespoons vanilla extract
- 5 oz raisins
- 2 oz butter
1. Preheat oven to 355 degrees
2. In a large mixing bowl, pour hot milk over bread. Blend eggs, sugar and vanilla in separate bowl. Stir egg mixture into the bread mixture and blend well. Add raisins. Mix well.
3. Melt the butter and pour into a 23x33cm (9x13 in) baking dish. Pour bread mixture over butter.
Bake for 40 minutes, or until firm and golden brown. Serve warm with custard.
(I had to bake mine for 55 minutes but that doesn't mean you need to. I adjusted for my own oven.)
As I've said before, I get real antsy when working on just one project, so I usually have 1 or 2 (ok, maybe 3 or 4) in the works.
I went to JoAnn's last weekend with my Mom and I bought a bunch of my favorite yarn. I usually stick to 2 main brands of yarn:
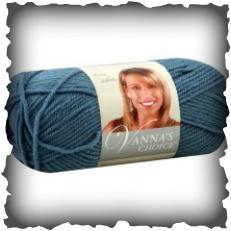 Vanna's Choice is made by Lion Brand and is a 4 Medium, mostly made of Acrylic and a little bit of Rayon. Not as soft as some, but I like it!
 I love Caron's Simply Soft as well. It's also a 4 Medium, but is made of 100% Acrylic. There is a noticeable difference, in my opinion, in the softness. My projects made of this yarn are usually softer and more pliable.
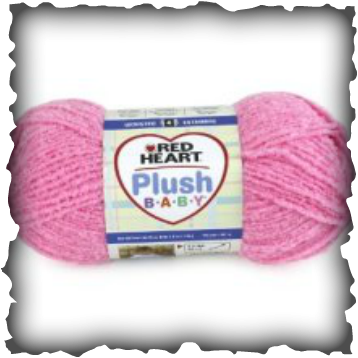
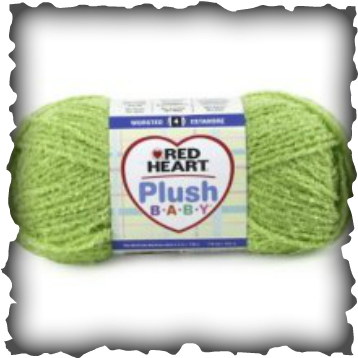
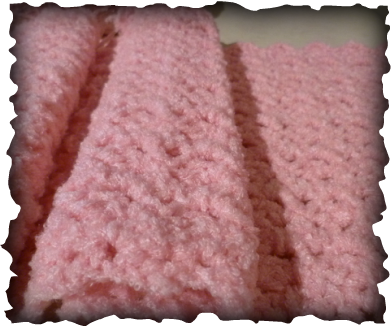
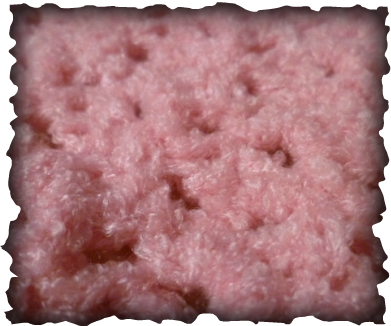
While perusing aisle after aisle of glorious colors and textures of yarn (oh happy days....sigh) I stumbled across Red Heart's Plush Baby. I LOVED the softness and the 2 colors that I found! And there was a baby blanket pattern on the back of the yarn paper! It was meant to be!
Ooooooh, Ahhhhh said the crowd....
The pink is "Strawberry" and the Green is "Kiwi".
I just fell in love with this yarn. I envisioned Baby Girl all cuddled up holding her special blankie made by Mama when she was tired....And then I started the pattern. Another sigh....
The pattern is easy, don't get me wrong. It's the nature of the stitch that I'm not happy about. When you add a second color, the previous color shows at the bottom of the stitches and it looks sloppy :-( Soooo, I decided to just use the Strawberry color instead of using both. I'm sure to find a use for the Kiwi!
Here is my WIP (Work in Progress) so far:
Look how fuzzy and soft! I've only completed about 30 rows or so, but there's only 77 rows plus the edging so I feel like I've got a good start on it.
I will definitely post piccies once it's finished. And of course I will post a piccie of Baby Girl using it too!
Here is the pattern from Red Heart if anyone is interested:
Blanket measures approximately 37" x 37"
Red Heart Plush Baby: 5 balls 9870 Blueberry (Color A)
Red Heart Plush Baby: 3 balls 9100 Coconut (Color B)
Crochet Hook: 5.5mm (US I-9)
Yarn Needle
Gauge: 14 dc=4"; 7 rows=4"
Use any hook size to obtain your gauge
BLANKET:
With A, ch 138
Row 1: sc in 2nd ch from hook, (ch 3, 2dc) all in same ch as sc worked into, *skip 3 ch, (sc, ch 3, 2dc - GROUP) all in next ch; rep from * across to last 4 ch: skip 3 ch, sc in last ch; turn
Rows 2-7: Ch 3, 2dc in first sc, * GROUP worked over next ch-3; rep from * to last st; sc in top of ch-3; turn
Rows 8-14: Rep Row 2 with colors B one time, (1 row A, 1 row B) 3 times. Fasten off B.
Rows 15-21: Rep Row 2 with A. Rep Rows 8-21 four more times.
Last Row: Ch 3, work 2dc in same sc, * (sc, ch1, hdc, dc) over ch-3; rep from * across to last st; sc in top of ch-3. Do not fasten off
BORDER:
With A of last Row, begin Border
Rnd 1: Working across side,ch1, (sc, ch 2, sc) all in corner, FIRST SIDE: * ch 1, skip sp equal to ch1, sc; rep from * across to next corner; ch1, (sc, ch2, sc - CORNER), working along bottom work as follows; * ch1, sc in ch sp of beg ch, ch1, sc in next sc of Row 1; rep from * across to next corner making last sc in corner st; Work (ch2, sc) in same sc, work SECOND SIDE same as first side to next corner to top; work CORNER, * ch1, skip 1 st or ch, sc in next st or ch, ch1; rep from * across; join with a sl st in first sc
Rnd 2: Work reverse sc evenly around entire blanket edge adding sts in corners to lay flat; join with a sl st in first st. Fasten off. Weave in ends.
I'd LOVE to see some of your finished works! Please feel free to post them!
Until next time....
Juls xoxo
Creative Thursday!
Today I want to share with you something I think is quite creative. You might like it so much that you copy it yourself, which is why I'm sharing!
My Mom came up with this idea and for the record, she is very creative and inventive. She is always coming up with neat ideas and different ways to display or use every day items.
Now that credit has been given where it is due, let's see!!!!
Wait for it....
Wait for it....
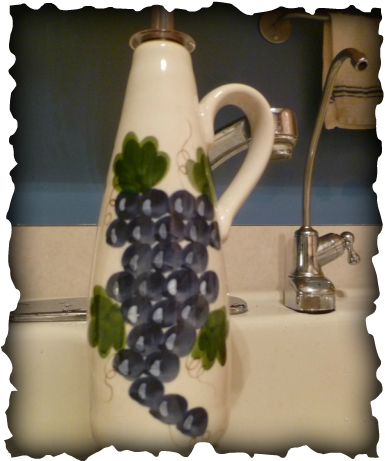
LOOK!!!!
"So what?!?!" you say?
"It's just an oil/vinegar dispenser!" you say and chuckle.
Noooooo, it's full of DISH SOAP! Hee hee! How cute is that?! I love this idea and think it's cute. To me, it looks a lot neater than a plastic bottle of Dawn or whatever kind of dish soap I would have sitting out around the sink area.
I think this came from the Salvation Army or Goodwill which is nice because you don't have to spend a lot of money to have something that looks neat. I ALWAYS browse through the shelves at thrift stores because you never ever know what you'll find! I try to think outside the box, maybe I get it from my Mom :-)
Anyway, I thought you would enjoy a little bit of creativity on this Thursday :-)
Other than being totally creative, my day has been spent caring for Baby Girl and taking care of house stuff. Nothing really exciting. Although it was a blast, heh heh, I am eagerly awaiting the return of my Prince (Hubby). I'm tired, hungry, and I need to straighten my hair as I look a HOT mess. *sigh* What's new?!?!
Until next time....
Juls xoxo
Today I'm going to share my favorite Quiche recipe. I guess I should say that I have worked as a chef for many, many years so I have lots of tricks and cool stuff to share.
This is a recipe for an Italian Quiche and it can be found under Recipes, to the right. Mild Italian sausage (because Hubby doesn't like spicy), green peppers, red peppers, onions, and Italian cheeses. I use a really nice store bought pie crust because I just don't have the time to make the crust from scratch. I used to, back in the day when I would run a Sunday Brunch, but those days are long gone! Sometimes I'm happy I don't have the stress anymore, and other times I miss it immensely. It's all I've known and I loved the challenge.
On a hooky note.....I think my problem, in my opinion, is that I am too impatient and antsy. My Hubby says it's because I'm an Aries and most times I blame all the bad stuff on that fact, but I'm really not sure if it's that or a character flaw!
I am currently in the middle of my HUGE Granny Stripe blanket, a blanket I'm making for Baby Girl, and I have decided this morning to start a set of 4 placemats for our kitchen table.
I thought it would be a nice idea to do a little tutorial for those of you who had never heard of or didn't know how to do a foundation single crochet. It's so simple, yet makes such a huge difference in the finished product.
When starting a chain, some people use a bigger hook than they use for the rest of their project. That's because the chain has little to no give once you start putting your stitches in. This can result in a slight bend on that first row. Soooooo, for this project of placemats, I really wanted all sides to be as straight as possible. That's why I decided to start out with a foundation single crochet!
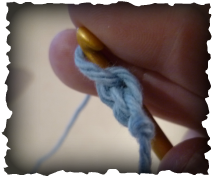
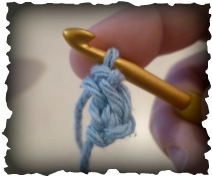
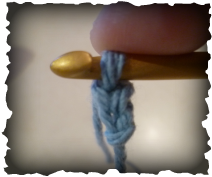 Start with a slip knot and chain 2
 Insert your hook into the first chain that you created
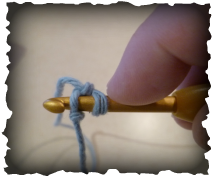
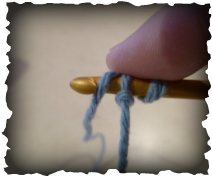 Yarn over
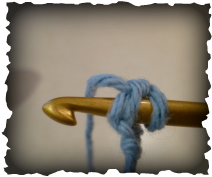
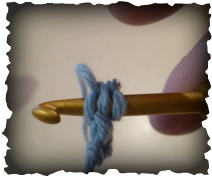
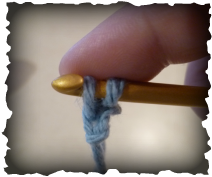 Pull yarn through 1st loop so you have 2 loops remaining on your hook
 Yarn over again
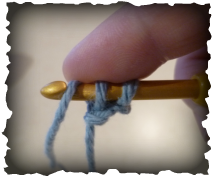
 Pull yarn through remaining loops
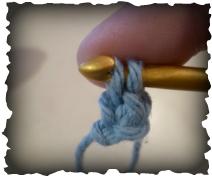
 If you turn your work slightly to the left and look, you will see what your hooking has created. This is where you will be inserting your hook in the next step
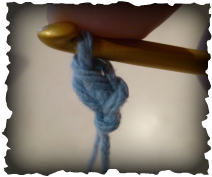
 This is somewhat of a side view of where to stick your hook
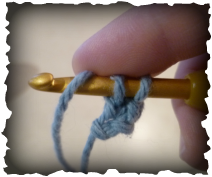
 Again, yarn over. You will be repeating the previous steps
 Pull yarn through the first loop so that you have 2 loops remaining on your hook
 Yarn over
 Pull yarn through remaining loops
 Tilt work slightly to the side again and find the chain that you created and insert your hook into the chain
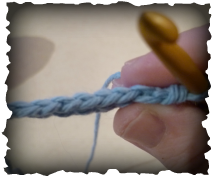 Keep repeating the steps until you build up a bit of hooky work. This is the chain side that was created
 And this is the single crochet row that was created on the opposite side
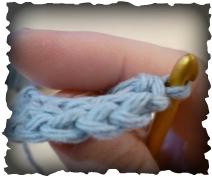
Once you get your work to the desired length, just turn as usual and work across using whatever stitches your project calls for.
Feel free to contact me with any questions or problems!
Until next time....
Juls xoxo
|


 RSS Feed